Saturday, March 13, 2010
Amazon Search Widget
Help support Nick by making your next purchase through my Amazon Search Widget:
Monday, February 15, 2010
How to Open a Fantom GreenDrive
To open a Fantom GreenDrive 1 TB , peel off the "void warranty if removed" sticker on the side to reveal 2 screws.


These screws were difficult to remove, so apply firm pressure to them when unscrewing in order to avoid stripping the screws.
Overall this drive is a solid case with an excellent Western Digital SATA 1TB 8MB cache Caviar Greendrive.
The reason for disassembling the drive was to connect another fullsize SATA drive to my laptop. To make life easier, I'll be ordering USB 2.0 to IDE SATA HDD Hard Drive Converter Cable for future connections :)
These screws were difficult to remove, so apply firm pressure to them when unscrewing in order to avoid stripping the screws.
Overall this drive is a solid case with an excellent Western Digital SATA 1TB 8MB cache Caviar Greendrive.
The reason for disassembling the drive was to connect another fullsize SATA drive to my laptop. To make life easier, I'll be ordering USB 2.0 to IDE SATA HDD Hard Drive Converter Cable
Saturday, January 30, 2010
Harmony One Remote - Easy to use
Logitech Harmony One Advanced Universal Remote
![Logitech Harmony One Advanced Universal Remote [Amazon Frustration-Free Packaging]](http://ws.amazon.com/widgets/q?MarketPlace=US&ServiceVersion=20070822&ID=AsinImage&WS=1&Format=_SL160_&ASIN=B002RL875A&tag=thinkcreateco-20)
- Creating activities makes turning on and off a set of components a breeze as well as automatically setting the inputs.
- No more "Turn the cable box on, change to HDM1 for the HTPC, then turn on the PC" ... now it's "Press the button that says Watch HTPC"
- You can update the hard buttons on the remote in order to control what you want (i.e. the 'last' button is now my 'favorites' button which makes flipping through my channel favorites trivial) and you can add buttons to the touch screen
Sunday, December 20, 2009
Stream media using an app built with the Roku SDK
Roku is a media streamer that streams Netflix in HD, Revision3, Blip.tv, Twit, etc. And now with the public SDK you can stream your local media by simply setting up a server that your home-brew app can point for its content.

This is a simple (and currently non-elegant)
solution to playing your local media on the Roku via a web server running on an OSX machine (i.e. macbook). It's a proof of concept that can be automated, cleaned up, simplified, and made more robust ... in time.
Pick up a Roku HD Player, Roku HD-XR Player, or Roku N1050 SD Player and have some fun with the SDK!
1) Getting started:
- Download the Roku SDK: http:/roku.com/developer
- Enable the roku developer menu on your device using the remote:
UP, UP, Down, Down, Left, Rigth, Left, Rigth, Select A, Select B, Start (just kidding)
(For real) Home 3x, Up 2x, Right, Left, Right, Left, Right
- Find your Roku IP address “Roku Player Settings”, “player info” to find the IP address
- To access the installer homepage, use your roku address: http://192.168.1.104
2) Start the media server on OSX
- Open the 'Settings' panel -> Sharing -> Web Sharing -> Server is running
- Place a m4v movie into the 'Users/nickc/Sites' dir (out of the box it supports .mp4, .wmv, .mov, and .m4v)
- Test out the path by copy/pasting it to your web browser:
http://192.168.1.110/~nickc/OfficeSpace.m4v
3) Modify the sample app:
- Goto the SDK dir:
cd rokudev/examples/source/simplevideoplayer/source
- Change the 'appMain.brs' file:
rokudev/examples/source/simplevideoplayer/source/appMain.brs
urls = ["http://192.168.1.110/~nickc/OfficeSpace.m4v"]
- There are other settings worth looking into if you have an HD movie and want to update the sample text/images
- Rebuild the app in the terminal:
cd rokudev/examples/source/simplevideoplayer/source
make
- Goto the Roku installer: http://192.168.1.104
Choose File -> rokudev/examples/zips/simplevideoplayer.zip
- The Roku will make a sound when it is done loading
4) Enter the Roku Player main menu
- The sample app will show in the menu as the last app
- Select it (which will show the sample description and images)
Thats it. Press play and your local movie on your network will begin playing from Roku!
Monday, November 16, 2009
1TB Hard Drives: Simple external, NAS, & NAS w/RAID
There are many options, brands, and features available in the external hard drive arena. I have narrowed the list based on price, quality, and personal experience with these brands. I highly recommend a NAS with at least 2 drives for the simple convenience of always on access and the redundancy of saving your data to 2 drives.
For simple external HD:
- Western Digital My Book Essential 1 TB USB 2.0 Desktop External Hard Drive WDH1U10000N = ~$108
- Fantom G-force Esata 1TB USB 2.0 7200RPM 16MB = ~$100
- Western Digital Caviar Green 1.5TB 3.5" SATA
For network solutions with RAID (backs up your data on 2 drives):
- D-Link 2-Bay (Diskless) Network Attached Storage DNS-323 + 2 1TB Western Digital Green HDs (combo deal) = ~$318
- Buffalo Technology LinkStation Pro Duo 2-Bay 2 TB (2 x 1 TB) Network Attached Storage LS-W2.0TGL/R1 (2 1TB hard drives) = ~$279
For network solutions with one drive:
- Iomega Home Media 1 TB Network Attached Storage = ~$140
- Buffalo Technology DriveStation FlexNet 1TB Network Attached Storage = ~$135
Here are some things you'll need to know:
- NAS = Network attached storage (router -> connects to HD -> accessible from all computers on network)
- RAID 1 = Backup data across 2 drives so if one fails, the other has an exact copy
- Gigabit Ethernet = faster transfer rates over compatible networks (get it so your future proof)
- 16MB Cache = faster access to data: there are lots of drives with 32MB for a good price too
- OEM HD = no cables included (which is not needed for a NAS)
- 7200 RPM = standard speed for desktop HDs but is more power hungry for external drives
- USB vs Firewire = all my drives are USB since firewire ports are not as common
Go with the NAS so you can set it up, access your files on your network from any computer, and have the peace of mind that it's backed up on 2 drives.
Saturday, December 30, 2006
revision3 + MCE + µTorrent = good times
Here's a guide on how to use µTorrent (microTorrent) to automatically download Revision3 shows for playback on a Media Center Edition (MCE) machine.
Parts List:
- Download the latest version of µTorrent.
- For customized folder icons, a graphic editor Gimp or Gimpshop.
Think:
So I tried MythTV, BeyondTV, MCE, & SageTV. They all have their own advantages. I settled on MCE simply because it's been running the longest without failure (believe it or not). Other bittorrent clients will also work, µTorrent has been running smoothly for me.
Now, here's how I download content that I like ...
Create:
A. Locate the RSS feed of a rev3 show:
- Goto Revision3.com -> click on "Diggnation"
- Locate the "Torrents Feeds" on the right
- Right click on your format of choice
- Select "Copy link location" from right click menu
- Note: For MCE bliss choose "WMV Large".

- Choose the "RSS Downloader" or Ctrl-R or the RSS feed
 icon.
icon. - Under the feeds tab -> "Add" a new feed
- Paste the full link into text box:

- Select the "Favorites" tab in the RSS Downloader window.
- Click "Add" -> enter title "digg"
- "Filter:" -> digg*
- "Save in:" -> Create and set a folder on your second hard drive: "Z:\Video Podcasts\diggnation".
- "Feed:" -> select the "diggnation" feed
- "Give download highest priority:" -> this will allow you to download it as soon as it's added.
- "Minimal interval:" -> 12 hours (timing is open to debate, see µTorrent site for details)
- Repeat for additional rev3 shows and others, i.e. Leo's "Call For Help" RSS feed.
- Depending on your machines performance, throttle your upload & download speed so it doesn't interfere with live TV recording: Options -> Preferences -> Connection -> Bandwidth Limiting.
- Note: Rev3 torrents begin with the show name, so when u add other feeds, use the show name in the filter i.e. indigital*, ctrl*, notmtv* etc.
- Note: I found it's best to DL bittorrent files to a separate physical drive so it doesn't mess with fragmenting your recorded TV and allows smooth playback.

- To visually enhance the setup a little more, you can customize the folder icons.
- Download any picture, edit it if you wish, & save it in the shows folder as "folder.jpg".
- The folder image will be updated shortly after adding the new "folder.jpg" image.
- Note: A quick google search led me to Jeffrey Klassen digg water drop pictures

E: Output video:
- Connect the TV to GeForce 6200LE via S-Video
- Connect the monitor via DVI
- Use the NVIDIA TV Wizard & set mode to "Dualview"
- Access the desktop and µTorrent on first display 1024x768 (monitor)
- Move & maximize the MCE interface screen on second display 800x600 (TV)
- -Or- view the shows on your Xbox media center extender.
Let µTorrent run in the background, download all your shows, & seed files for others. Watch the latest full screen video podcast shows from the native MCE interface, no plug-ins required.
Enjoy! nickc316 at gmail
Saturday, April 30, 2005
DIY: Pioneer Aux Input
Parts list:
- 1/8" Stereo Panel-Mount Jack (Catalog #: 274-248)
- 1 ft. Stereo Patch Cable (Catalog #: 42-2497)
- Hookup Wire 22 AWG (Catalog #: 278-1221)
- Electrical Tape
- Pioneer in dash radio with CD-Changer Controls (mine is a DEH-P9300)
- Pioneer IP-Bus cable from CD-Changer (CD-IP150, CD-IP151E, or CD-IP28)
Project at a glance: creative muvo mp3 player -> stereo patch cable -> audio jack -> Pioneer CD changer IP-Bus -> DIY Pioneer Aux Input
Think: Over the past couple of years I have upgraded my Pioneer Car CD changer to meet my needs. I went from a 6CD to a 12CD and now I have a portable MP3 player I want to connect. Pioneer offers an auxiliary adapter (CDRB-10) for ~$40 or an iPod adapter (CD-IB100) for ~$130. The auxiliary adapter appears to be a simple input-to-RCA-out, so I decided to make an aux adapter myself for ~$6. A quick tally of the cost of the parts listed is ~$12 bucks but you'll have plenty of wire for your future projects and an extra stereo jack. :)
Create: The first task was to figure out how to get the input from the MP3 player into the head unit. The solution is simple, most Pioneer decks have an option to turn on the AUX input and it so happens that mine is one of them.
To enable the AUX input complete the following:
1) Power down the unit (hold the source button)
2) Press and hold the #1 (or in my case hold first soft key next to the back key)
3) Select AUX, and then use the up arrow to turn it "ON"
4) Press the source key until you see "AUX"
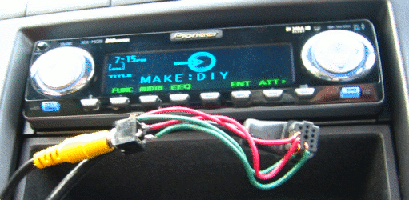
Once the deck is set to the AUX input it is expecting raw audio from a device attached to the IP-Bus. Now the trick is to see which pins on the bus are for audio. After many trial and error attempts, I have locked down the following setup for audio inputs on the IP-Bus:
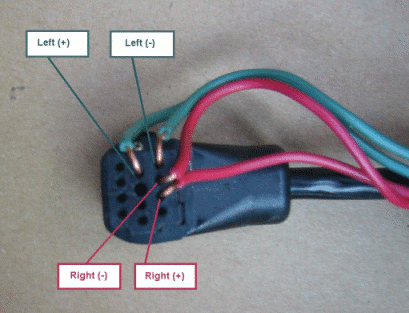
Figure 1. IP-Bus pin input. (I chose the least invasive method of connecting with the IP-Bus.)
Now to connect the 1/8" audio jack to the IP-Bus, we need to solder the 22 AWG hookup wire to the legs of the jack. The (-) leads share one leg and the (+) leads have their own separate legs as shown here:
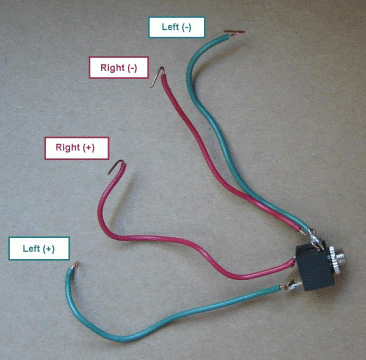
Figure 2. 1/8” (3.5mm) Audio jack wired up.
Inserting the wire into the IP-Bus and bending it over the edge will create the angles at the end of the wire. This will provide a flat surface for us to tape the wires in place. You could go extreme and split open the IP-Bus and fish out the wires or go for the classic tape and zip-tie route I took.
Complete: Once we have the audio jack wired up the next step is to place the wire leads from Figure 2 into the IP-Bus as in Figure 1 and give it a test run:
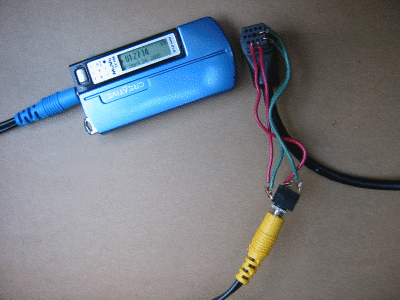
Figure 3. Connect MP3 player using the audio patch cable to the audio jack.
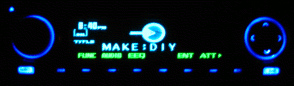
Success, the audio is playing! Now I took a little extra time and labeled the input from "AUX" to "MAKE:DIY". Complete the following to adjust the title: Function -> TTLin -> ABC -> Up and down arrows to enter your personal title -> ABC key to toggle upper and lower case -> right arrow all the way one past the last entry -> Back soft key -> done.
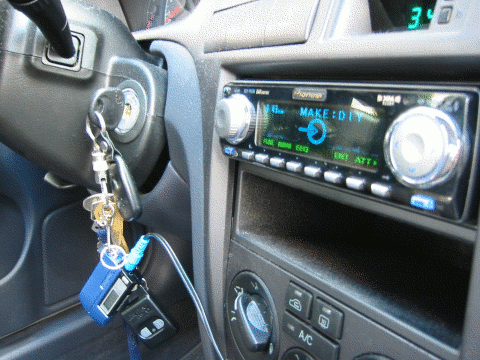
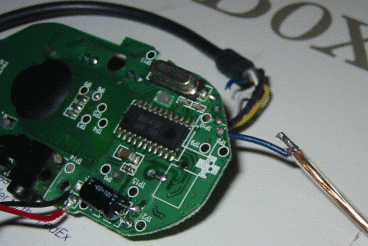
Figure 4. Apply the tape, zip-ties and tuck everything away so it is nice and neat.
Optional: If the sound is low at the max volume of the MP3 player then the AUX sound level can be adjusted using the SLA (source level adjustment). While in AUX mode complete the following to adjust the SLA: AUDIO -> NEXT -> NEXT -> Press SLA -> Press up or down to adjust the source volume -> done.
This DIY idea can be applied to other stereos with CD changer inputs with the proper wiring diagrams. Please post any similar projects in the comments for all the to see. The official Pioneer auxiliary input might have some advantages because of its "gold" connectors and possibly some internal circuitry, so consider this option if you want the absolute best sound with this configuration.
Enjoy the DIY: Pioneer Aux Input!
nickc316 at gmail.com
- 1/8" Stereo Panel-Mount Jack (Catalog #: 274-248)
- 1 ft. Stereo Patch Cable (Catalog #: 42-2497)
- Hookup Wire 22 AWG (Catalog #: 278-1221)
- Electrical Tape
- Pioneer in dash radio with CD-Changer Controls (mine is a DEH-P9300)
- Pioneer IP-Bus cable from CD-Changer (CD-IP150, CD-IP151E, or CD-IP28)
Project at a glance: creative muvo mp3 player -> stereo patch cable -> audio jack -> Pioneer CD changer IP-Bus -> DIY Pioneer Aux Input
Think: Over the past couple of years I have upgraded my Pioneer Car CD changer to meet my needs. I went from a 6CD to a 12CD and now I have a portable MP3 player I want to connect. Pioneer offers an auxiliary adapter (CDRB-10) for ~$40 or an iPod adapter (CD-IB100) for ~$130. The auxiliary adapter appears to be a simple input-to-RCA-out, so I decided to make an aux adapter myself for ~$6. A quick tally of the cost of the parts listed is ~$12 bucks but you'll have plenty of wire for your future projects and an extra stereo jack. :)
Create: The first task was to figure out how to get the input from the MP3 player into the head unit. The solution is simple, most Pioneer decks have an option to turn on the AUX input and it so happens that mine is one of them.
To enable the AUX input complete the following:
1) Power down the unit (hold the source button)
2) Press and hold the #1 (or in my case hold first soft key next to the back key)
3) Select AUX, and then use the up arrow to turn it "ON"
4) Press the source key until you see "AUX"
Once the deck is set to the AUX input it is expecting raw audio from a device attached to the IP-Bus. Now the trick is to see which pins on the bus are for audio. After many trial and error attempts, I have locked down the following setup for audio inputs on the IP-Bus:
Figure 1. IP-Bus pin input. (I chose the least invasive method of connecting with the IP-Bus.)
Now to connect the 1/8" audio jack to the IP-Bus, we need to solder the 22 AWG hookup wire to the legs of the jack. The (-) leads share one leg and the (+) leads have their own separate legs as shown here:
Figure 2. 1/8” (3.5mm) Audio jack wired up.
Inserting the wire into the IP-Bus and bending it over the edge will create the angles at the end of the wire. This will provide a flat surface for us to tape the wires in place. You could go extreme and split open the IP-Bus and fish out the wires or go for the classic tape and zip-tie route I took.
Complete: Once we have the audio jack wired up the next step is to place the wire leads from Figure 2 into the IP-Bus as in Figure 1 and give it a test run:
Figure 3. Connect MP3 player using the audio patch cable to the audio jack.
Success, the audio is playing! Now I took a little extra time and labeled the input from "AUX" to "MAKE:DIY". Complete the following to adjust the title: Function -> TTLin -> ABC -> Up and down arrows to enter your personal title -> ABC key to toggle upper and lower case -> right arrow all the way one past the last entry -> Back soft key -> done.
Figure 4. Apply the tape, zip-ties and tuck everything away so it is nice and neat.
Optional: If the sound is low at the max volume of the MP3 player then the AUX sound level can be adjusted using the SLA (source level adjustment). While in AUX mode complete the following to adjust the SLA: AUDIO -> NEXT -> NEXT -> Press SLA -> Press up or down to adjust the source volume -> done.
This DIY idea can be applied to other stereos with CD changer inputs with the proper wiring diagrams. Please post any similar projects in the comments for all the to see. The official Pioneer auxiliary input might have some advantages because of its "gold" connectors and possibly some internal circuitry, so consider this option if you want the absolute best sound with this configuration.
Enjoy the DIY: Pioneer Aux Input!
nickc316 at gmail.com
Saturday, April 23, 2005
Tunecast update
Think: I posted that I was not happy with the range from the Belkin RF transmitter so I decided to used John Riney's comment and added some wire to the internal antenna of the Belkin Tunecast II from the link: tunecast antenna mod.
Create: The instructions are clear and well documented at the link above so i won't rewrite them here. Just really be careful with the battery leads b/c they are very fragile as i had to repair them 2x's :)
Found the blue wire labeled "ANT", snipped it, soldered it, and taped it up.
Closed it back up and pulled the wire easily out the other side.
Complete: I didn't get the full range i was looking for, only added ~1' of wire, but after placing the modified tunecast next to the podcast shower radio I have no more random pops and fadeouts! Thanks John!
nickc316 at gmail.com
Thursday, April 21, 2005
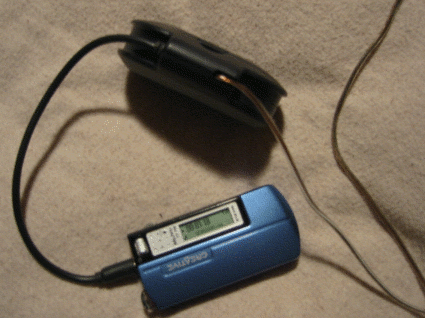
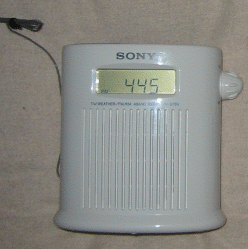
DIY: podcast shower radio
Part list:
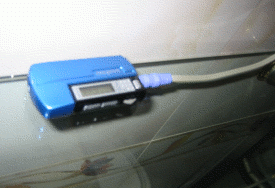
- Sony ICF-S79V (or any battery powered shower radio)
- Creative Muvo TX FM (or any player willing to take some steam)
- Stereo-to-stereo audio coupler (~$2 bucks at the shack, 274-1555)
- Audio patch cable (stereo to help out the FM transmitter)
- Belkin Tune Cast II FM Transmitter with auto-off
- Energizer Ni-MH rechargeables and charger
Project at a glance: creative muvo mp3 player -> stereo wire -> RF transmitter -> RF input of 87.7FM -> Sony shower radio

Think: I acquired a Sony ICF-S79V shower radio to listen to current events because I was falling behind now that podcasts were filling my radio time. After a few morning of bouncing back and forth between presets station during commercials i was frustrated b/c that was the beauty of podcasts, no commercials. (mr curry please help establish a standard for shows so we can scrape the commercials if we so choose to.) So back to my thoughts, how do I get podcasts to work with my shower radio?
Create: Simple solution (and probably clear by now). What is the only way to get input into this device, RF! I had a Belkin RF transmitter that worked poorly in my car but had everything I needed for this project. I was hoping to setup the RF outside the shower but I literally have to wrap the little antenna around the transmitter. I stopped over at radioshack to get an Audio-Coupler and pulled a stereo to stereo-stereo connector from an older PC speaker system. The next challenge was power! The best solution (and i am still impressed) was good 'ol Energizer Ni-Mh rechargeable batteries and the energizer charger from buy.com. I did some research on what all the specs meant and they came up as the best for price. All this for 10~15 minutes of audio freedom. I think its worth it!
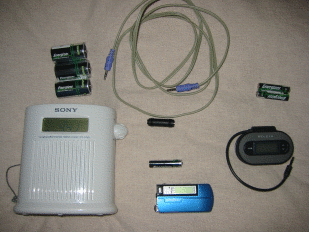
Complete: This setup has been working for me for the last 4 or 5 weeks. I have a routine were i charge the 3 C batteries (+1 C battery in storage b/c you have to buy and charge them in pairs, how convenient) every 2 weeks. One issue I have had was when removing the batteries and charging it overnight I loose the presets and time on the radio. I am going to invest in standby C (regular) batteries so i can the time in the device. The RF transmitter needs to charge its 2 AAA batteries whenever it dies, haven't figured out its pattern yet. My creative muvo has 1 AAA labeled #1 and when the #2 battery is dead they both go into the charger. Sounds really silly but it works like a charm. Now to figure out if the steam will affect my devices ... time will tell.
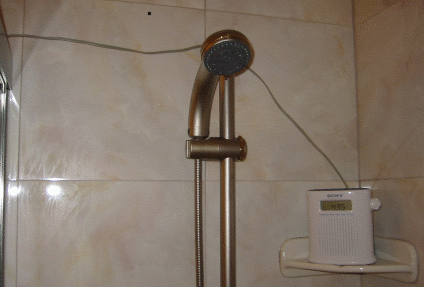
I stayed away from “plug in the outlet” components here for my safety. I do NOT recommend using A/C electricity for anything in this project ... be safe! Also when dealing with water, i am willing to sacrafice any parts used in this project so please understand what you are doing ... enjoy!
Thank you joanna for the sony radio [christmas], and the mp3 player & fm tuner [valentines].
nickc316 at gmail.com
- Sony ICF-S79V (or any battery powered shower radio)
- Creative Muvo TX FM (or any player willing to take some steam)
- Stereo-to-stereo audio coupler (~$2 bucks at the shack, 274-1555)
- Audio patch cable (stereo to help out the FM transmitter)
- Belkin Tune Cast II FM Transmitter with auto-off
- Energizer Ni-MH rechargeables and charger
Project at a glance: creative muvo mp3 player -> stereo wire -> RF transmitter -> RF input of 87.7FM -> Sony shower radio
Think: I acquired a Sony ICF-S79V shower radio to listen to current events because I was falling behind now that podcasts were filling my radio time. After a few morning of bouncing back and forth between presets station during commercials i was frustrated b/c that was the beauty of podcasts, no commercials. (mr curry please help establish a standard for shows so we can scrape the commercials if we so choose to.) So back to my thoughts, how do I get podcasts to work with my shower radio?
Create: Simple solution (and probably clear by now). What is the only way to get input into this device, RF! I had a Belkin RF transmitter that worked poorly in my car but had everything I needed for this project. I was hoping to setup the RF outside the shower but I literally have to wrap the little antenna around the transmitter. I stopped over at radioshack to get an Audio-Coupler and pulled a stereo to stereo-stereo connector from an older PC speaker system. The next challenge was power! The best solution (and i am still impressed) was good 'ol Energizer Ni-Mh rechargeable batteries and the energizer charger from buy.com. I did some research on what all the specs meant and they came up as the best for price. All this for 10~15 minutes of audio freedom. I think its worth it!
Complete: This setup has been working for me for the last 4 or 5 weeks. I have a routine were i charge the 3 C batteries (+1 C battery in storage b/c you have to buy and charge them in pairs, how convenient) every 2 weeks. One issue I have had was when removing the batteries and charging it overnight I loose the presets and time on the radio. I am going to invest in standby C (regular) batteries so i can the time in the device. The RF transmitter needs to charge its 2 AAA batteries whenever it dies, haven't figured out its pattern yet. My creative muvo has 1 AAA labeled #1 and when the #2 battery is dead they both go into the charger. Sounds really silly but it works like a charm. Now to figure out if the steam will affect my devices ... time will tell.
I stayed away from “plug in the outlet” components here for my safety. I do NOT recommend using A/C electricity for anything in this project ... be safe! Also when dealing with water, i am willing to sacrafice any parts used in this project so please understand what you are doing ... enjoy!
Thank you joanna for the sony radio [christmas], and the mp3 player & fm tuner [valentines].
nickc316 at gmail.com
Sunday, March 27, 2005
intro
hey. its easter sunday and i have decided to create a blog where i can post my creations and projects. Does anyone remeber constructs and the little blue pieces?

