- 1/8" Stereo Panel-Mount Jack (Catalog #: 274-248)
- 1 ft. Stereo Patch Cable (Catalog #: 42-2497)
- Hookup Wire 22 AWG (Catalog #: 278-1221)
- Electrical Tape
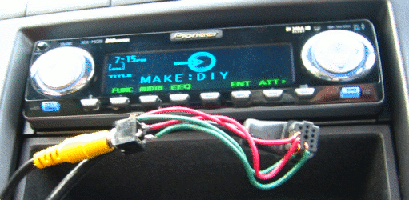
- Pioneer in dash radio with CD-Changer Controls (mine is a DEH-P9300)
- Pioneer IP-Bus cable from CD-Changer (CD-IP150, CD-IP151E, or CD-IP28)
Project at a glance: creative muvo mp3 player -> stereo patch cable -> audio jack -> Pioneer CD changer IP-Bus -> DIY Pioneer Aux Input
Think: Over the past couple of years I have upgraded my Pioneer Car CD changer to meet my needs. I went from a 6CD to a 12CD and now I have a portable MP3 player I want to connect. Pioneer offers an auxiliary adapter (CDRB-10) for ~$40 or an iPod adapter (CD-IB100) for ~$130. The auxiliary adapter appears to be a simple input-to-RCA-out, so I decided to make an aux adapter myself for ~$6. A quick tally of the cost of the parts listed is ~$12 bucks but you'll have plenty of wire for your future projects and an extra stereo jack. :)
Create: The first task was to figure out how to get the input from the MP3 player into the head unit. The solution is simple, most Pioneer decks have an option to turn on the AUX input and it so happens that mine is one of them.
To enable the AUX input complete the following:
1) Power down the unit (hold the source button)
2) Press and hold the #1 (or in my case hold first soft key next to the back key)
3) Select AUX, and then use the up arrow to turn it "ON"
4) Press the source key until you see "AUX"
Once the deck is set to the AUX input it is expecting raw audio from a device attached to the IP-Bus. Now the trick is to see which pins on the bus are for audio. After many trial and error attempts, I have locked down the following setup for audio inputs on the IP-Bus:
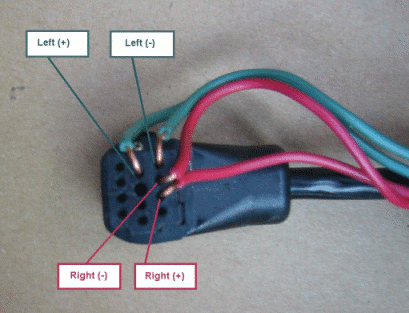
Figure 1. IP-Bus pin input. (I chose the least invasive method of connecting with the IP-Bus.)
Now to connect the 1/8" audio jack to the IP-Bus, we need to solder the 22 AWG hookup wire to the legs of the jack. The (-) leads share one leg and the (+) leads have their own separate legs as shown here:
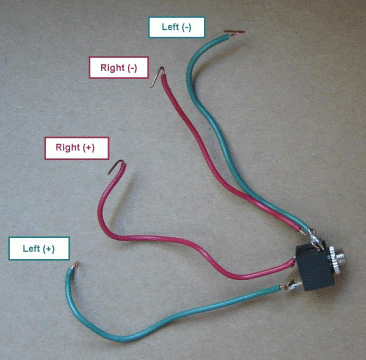
Figure 2. 1/8” (3.5mm) Audio jack wired up.
Inserting the wire into the IP-Bus and bending it over the edge will create the angles at the end of the wire. This will provide a flat surface for us to tape the wires in place. You could go extreme and split open the IP-Bus and fish out the wires or go for the classic tape and zip-tie route I took.
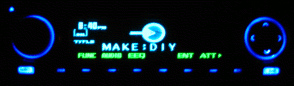
Complete: Once we have the audio jack wired up the next step is to place the wire leads from Figure 2 into the IP-Bus as in Figure 1 and give it a test run:
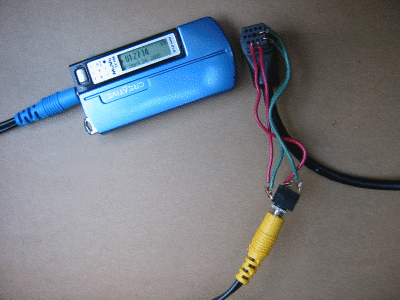
Figure 3. Connect MP3 player using the audio patch cable to the audio jack.
Success, the audio is playing! Now I took a little extra time and labeled the input from "AUX" to "MAKE:DIY". Complete the following to adjust the title: Function -> TTLin -> ABC -> Up and down arrows to enter your personal title -> ABC key to toggle upper and lower case -> right arrow all the way one past the last entry -> Back soft key -> done.
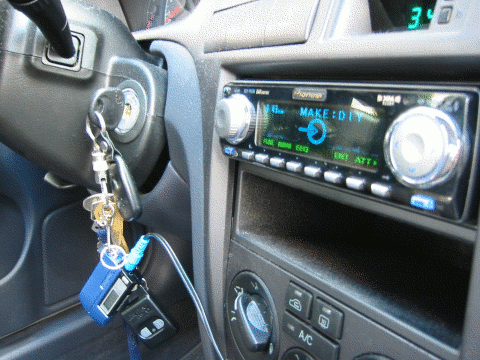
Figure 4. Apply the tape, zip-ties and tuck everything away so it is nice and neat.
Optional: If the sound is low at the max volume of the MP3 player then the AUX sound level can be adjusted using the SLA (source level adjustment). While in AUX mode complete the following to adjust the SLA: AUDIO -> NEXT -> NEXT -> Press SLA -> Press up or down to adjust the source volume -> done.
This DIY idea can be applied to other stereos with CD changer inputs with the proper wiring diagrams. Please post any similar projects in the comments for all the to see. The official Pioneer auxiliary input might have some advantages because of its "gold" connectors and possibly some internal circuitry, so consider this option if you want the absolute best sound with this configuration.
Enjoy the DIY: Pioneer Aux Input!
nickc316 at gmail.com


14 comments:
Tim R. asked me if there was a solution for a Honda factory radio. My suggestion is to look into Honda Peripheral Car Cable Adapter at crutchfield.com ($9.99). I don't think this is a standalone adapter to be used as is, but if you figure out which of the inputs are for audio then you can follow the instructions to connect the audio jack to it.
Crutchfield has other completed kits for ~$60 and ~$120 dollars.
Post and let me know if anyone has or will trys this.
nickc316
Thanks Nick...my 10 cd changer was giving me perpetual trouble..itś getting old too..but my pioneer system still delivers great music..i just hooked up my creative mp3 player to it..i can still have 10 cds full of songs and more..that too at without burning a hole in my pocket.... Ramu Nair
Just wanted to say thank you! This guide and the one posted in the comments on the makezine site helped me a lot (http://www.gutterslide.com/ip-bus_hack/).
Ended up making my own version of the mod from reading both of them (my situation is a little different since I'm running both the CD changer and the AUX plug, and in my room, not a car, haha). Thanks!
hello, my car radio was just stolen and i was wondering if there's a way to just hook up an adapter into the system for my ipod. i don't care about radio or cds - i just want my ipod to go straight into the system. any tips?
thanks!
Hi dror, Ramu Nair & Ernesto: I am so glad my article helped you and hope you have enjoyed the setup!
Hi Caitlin, I would suggest you look into picking up a cheap 4 channel car amplifier, hook up the power & ground wire, use an on/off switch for the remote wire, and connect your ipod to the amp inputs using a simple Mini-to-RCA Cable. This will allow your ipod to play over your existing speakers with no radio head unit and control the music directly from the ipod. If you need help installing this, your local car audio stereo place will be able to do this in a snap.
Enjoy!
Nick C.
which would be more cost effective: buying a new stereo or picking up the things you mentioned?
hi!!
thanks for the idea but i have a problem if my conector is male what i can do?
Hi Toro, the back of the pioneer head unit will have the male connector. If you do not already have an IP-Bus cable, then pick up an input adapter from amazon: Pioneer CD RB10 - IP-Bus input adapter
This idea is great but not for me... I have a PRS800 head unit, CD-BTB BlueTooth controller, TS-W1000D4 subs, a PRS-D2000SPL amp, Premier components, two GM6300 amps, a SoundSteam PQ7, SoundStream 4 Farad cap, Optima RedTop battery, all 1/0 power and ground, DB link fuse blocks, Esoteric RCA cable (matched), and about 2 motnhs of fabrication work into getting 225 sq. ft of DynaMat and other sealing and quieting into the system, and I can't see hacking the iP Bus link on my head unit...
I must say, however, that it is ingenuity like yours that keeps autosound competition alive, and that it is really cool that you took the time to figure out how these cables interface, and made something like this.
Any thoughts on creating a chassis for it? An old A/C adapter and a tube of silicone would seal this completely, and allow a bit of shielding from RFI. It would also be durable. It is also possible to get iP bus female cable ends, as Pioneer has cable extensions for iP bus link compatible accessories which are to be mounted in remote locations, such as CD changers, TV controllers, and the like.
I realize that this is a finished project, and that it works perfectly, I just thought I would add my $.02
Thanks for a cool write-up!
Sweet! I may take this route instead of buying a Pioneer aux input module.
Thank you! I changed my player from lg to pioneer today, and i found a cable to a cd changer that was cutted, made my own aux cable with this cable. :)
hi, i've tried your awesome DIY AUX in, and it works!!! thank you very very much~
but there's one thing i kinda not understand, im using Pioneer FH-P5000MP, the rear AUX in slot is exactly the one u showed in ur post, well it works fine because every speaker projected sound. but then, when i adjust the balance (L/R) in my device, (im using Nokia N95 to test the AUX), the result wasnt satisfied me, cuz, when i drag to full left channel, then whole sound system's sound goes volume downed, and when i drag to full right channel, it goes louder...@@
izit kinda wiring problem or am i connected the wrong way?
PS, if i set my N95 to balance (100% L and 100% R), den it got no problem, only if when i drag to left only or right only, the result wasnt exactly i wan...
can u update me to my email address?
teowjoonwhye@live.com
thank you very much...
Any chance we can get pictures back?
Pioneer in dash radio with CD-Changer Controls (mine is a DEH-P9300) ... pcarstereo.blogspot.com
Post a Comment